Most small-appliance storage solves one problem and creates another: you clear the counter, then you’re hauling a 12-pound mixer out of a base cabinet twice a week.
The part most kitchens get wrong is matching storage depth to how often the appliance gets used.
A coffee maker that runs every morning belongs in an appliance garage at counter height where a roll-up door hides it but leaves it plugged in and ready, not buried three shelves deep next to a bread machine you fire up twice a year.
1. Use an Appliance Garage, Hutch, or Closed Cabinet

A built-in cabinet with a door—roll-up, flip-up, or bi-fold—keeps coffee machines, blenders, toasters, and food processors accessible but invisible when you close it.
Roll-up tambour doors work best in compact kitchens because they disappear into the cabinet instead of swinging into your workspace, and bi-fold or lift-up panels suit larger layouts where clearance is not tight.
Most appliance garages sit at counter height so you can slide a blender or food processor straight out without lifting, and if you run an outlet inside the cabinet you can use a coffee maker or electric kettle without pulling it onto the counter at all.
The best placement depends on how you move through the kitchen: near a coffee station if that is where your morning starts, beside a prep area if you blend or chop daily, or tucked into a corner by the sink if that is the only dead space you have.
A clutter-free counter appeals to buyers, so this built-in storage may add resale value when you sell.
2. Store Appliances in a Dedicated Pantry Space
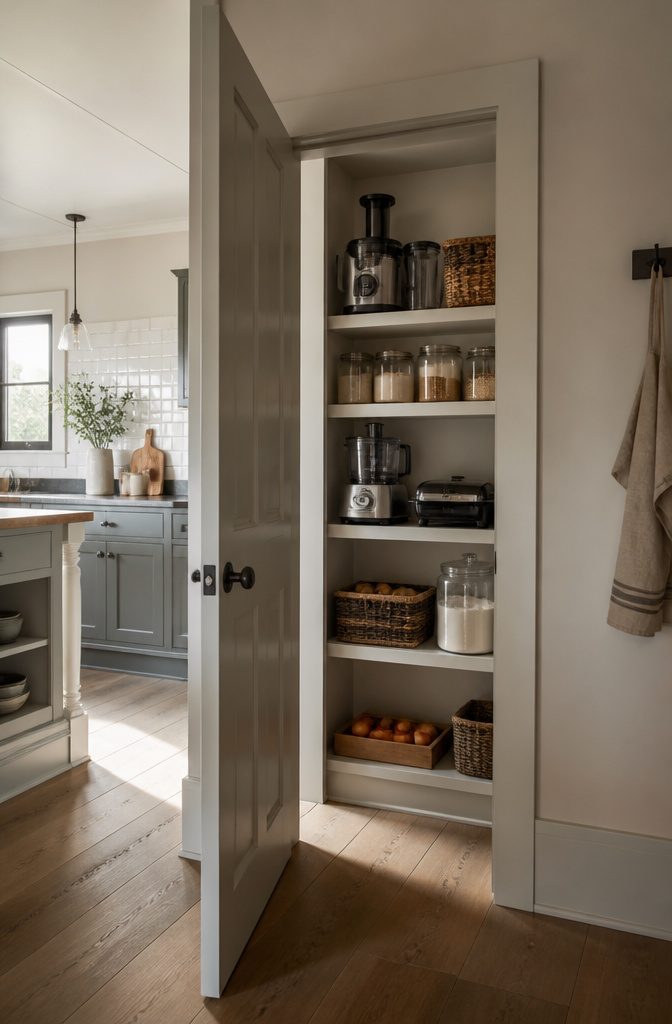
Pantry shelves offer a straightforward way to keep appliances behind a closed door and off the counter.
A tall, narrow cabinet like an IKEA Sektion frame works particularly well because it fits appliances without eating up floor space, and the Sektion line lets you customize shelves and doors to match your kitchen.
If you’re setting aside pantry space for this, appliances that show up less often—juicers, food processors, sandwich toasters—are good candidates for storage alongside bulk items or dry goods.
When I look at how different kitchens handle this, two approaches stand out. One is to dedicate a full pantry to appliances and keep them separate from food storage.
The other is to carve out a shelf or section within an existing pantry, which means less cabinet real estate but still keeps everything tucked away.
Both work, and the choice depends on how many appliances you’re storing and whether you have the room to give them their own zone.
3. Install an Appliance Lift Shelf

A lift shelf raises a heavy stand mixer or food processor from low cabinet storage to counter height when you need it.
The mechanism does the lifting, so you skip the awkward pull and hoist that usually comes with a twelve-pound appliance stored below the waist. Once you finish mixing, the shelf folds back into the cabinet on its own.
A lift shelf adds so much convenience to your current cupboard storage. These purpose-built shelves are popular for stand mixers, so they’re pretty sturdy and suitable to hold most small appliances.
Rev-A-Shelf makes a lift shelf with a 60-pound capacity that sells for $538.65, and it includes a mechanical assist system that handles the weight smoothly.
If that price is too steep, the lift mechanism alone runs $142.99, and you build your own platform to fit. A Blum cabinet lift mechanism costs around $79.00, which leaves more room in the budget but still requires assembly.
The DIY route lets you size the platform exactly to your appliance, though you give up the soft-close feature that folds the whole unit back without a push.
4. Build Appliance Storage Into a Kitchen Island

An island with built-in storage keeps appliances out of sight without touching your perimeter counters.
If you have room to add one or already have an island in place, drawers and pull-out shelves in the base can hold mixers, blenders, food processors and anything else you use regularly but don’t want to see all day.
A pre-built island works if you’re starting from scratch; a custom build lets you size compartments to fit specific appliances.
Some islands house appliances directly: a wine cooler, a cooktop, even a range if the layout allows.
For smaller gear like a stand mixer, an appliance lift built into the island lets the machine rise to counter height when you need it and drop back down when you’re done.
That keeps a heavy mixer accessible without the countertop real estate. The island approach works best when you have enough floor space that the addition doesn’t block traffic, and when you want your main work zones clear.
5. Install Panel-Ready or Built-In Appliances
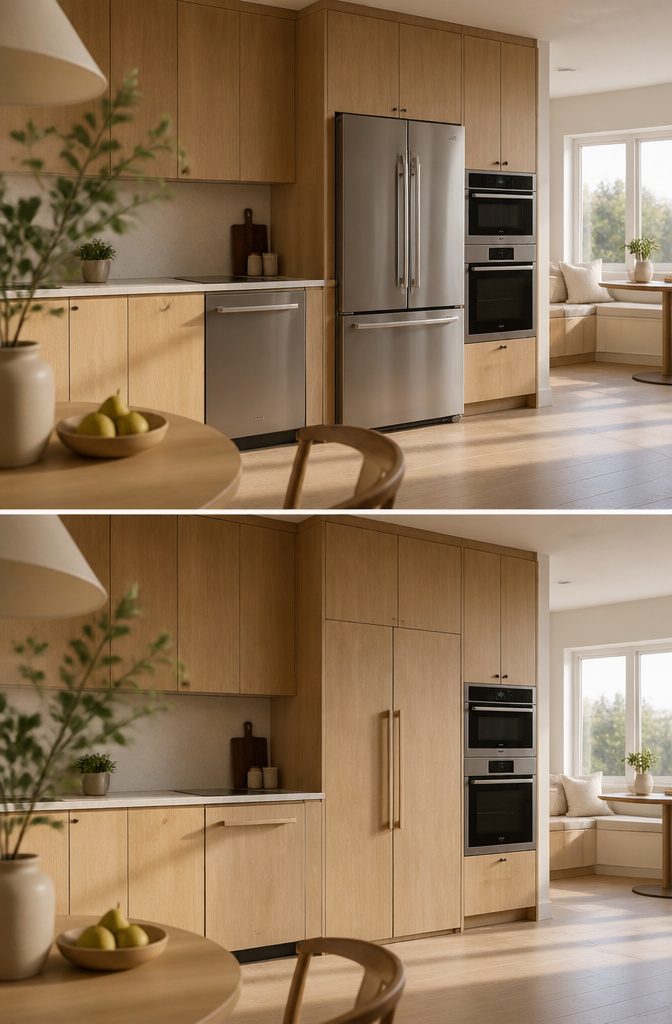
Panel-ready appliances let you fit custom panels that match your existing cabinetry right onto the face of refrigerators, freezers, and dishwashers.
The appliance disappears into the line of cabinets, and what could have been a stainless steel interruption reads as one continuous run of woodwork instead.
I’ve seen this used most often on refrigerators, where the visual weight matters most, but dishwashers benefit just as much when you want a cleaner look along the lower cabinets.
Built-in units take the idea further by fitting the appliance into the cabinetry itself rather than just covering its front.
Ovens, microwaves, coffee systems, and refrigerators can all be specified as built-ins, and the result is a kitchen that reads more like furniture than a lineup of separate machines.
Custom cabinetry for panel-ready or fully integrated appliances costs more and needs careful planning: you’ll usually work with a professional kitchen designer and master carpenter, and the bill reflects that level of work.
6. Use Drawers or Pull-Out Shelves
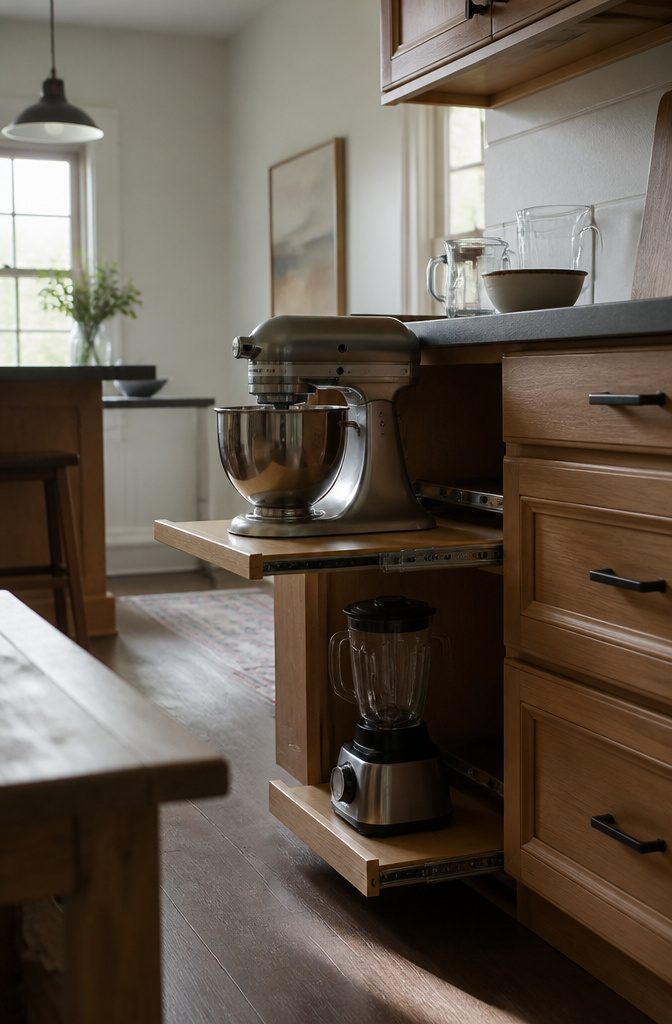
A drawer deep enough to hold a toaster or stand mixer keeps the appliance ready without giving up counter space.
Standard cabinet drawers work if they clear the appliance height, but pull-out shelves mounted inside a base cabinet give you more vertical room and let you slide a heavy mixer forward without lifting it over a drawer edge.
The top drawer or the highest pull-out shelf should hold what you use several times a week; anything buried below that spot becomes harder to reach than something sitting on the counter.
A two-tier pull-out fits a blender on top and a food processor below, though you will need to move the top appliance to reach the one underneath.
Single-tier organizers slide all the way out and cost less, usually under $100 for a basic wire frame.
Full cabinet pull-outs with wood shelves and soft-close rails run $200 to $450 depending on width and weight rating, but they handle stand mixers without flexing.
Measure the appliance with its cord bundled before you buy a pull-out. A six-quart mixer needs fourteen inches of clearance, and most base cabinets give you only twelve inches of usable depth once the drawer box and slides are in.
7. Store Appliances in a Freestanding Armoire

A freestanding armoire lets you move small appliances out of sight without locking them into permanent cabinetry.
If you have an unused corner or a wall that does not already hold built-in cabinets, a tall armoire gives you shelf space for blenders, mixers, and other gadgets you would rather not leave on the counter.
You can open the doors, grab what you need, and close them again when the work is done.
The best part: some armoires can be wired from the back. A cavity cut through the rear panel lets you plug appliances in without pulling them forward, so a coffee maker or toaster stays ready to use behind closed doors.
That setup keeps the counter clear and the appliances within reach at the same time.
8. Use Corner Cabinet Space With a Pull-Out Tray
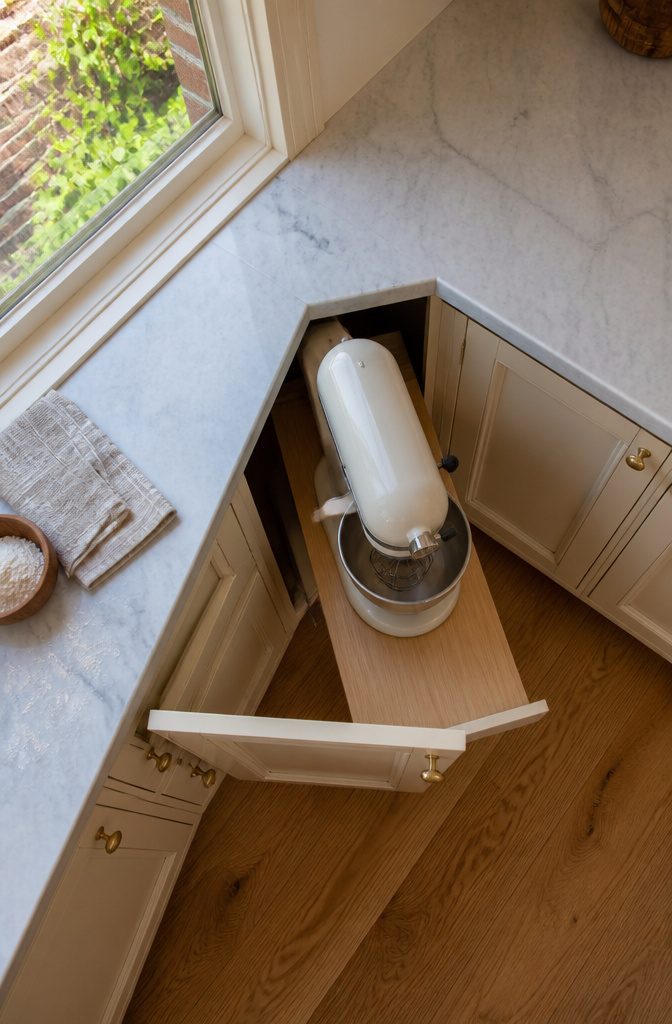
Corner cabinets sit awkward in most kitchens, too deep to reach into comfortably and angled in ways that waste space.
A pull-out shelf or sliding tray brings appliances forward from the back corner so you’re not stretching your arm in and dragging sticky rubber feet across plywood.
Rev-A-Shelf makes a dual-tier pull-out unit that mounts inside the cabinet and extends toward you when you open the door; it runs $449.83.
A lazy Susan-style shelf from the same brand costs $223.99 and rotates items into reach instead of sliding them forward.
Both work, but I’d choose the pull-out over the lazy Susan for taller appliances — a stand mixer on a rotating shelf tips easier than one gliding straight out.
If installing hardware isn’t an option, a bamboo sliding tray placed under the appliance gives you the same smooth pull for $37.89. It doesn’t mount, just sits on the shelf, and the appliance rides out on it when you pull.
9. Put a Microwave in a Pantry or Cupboard
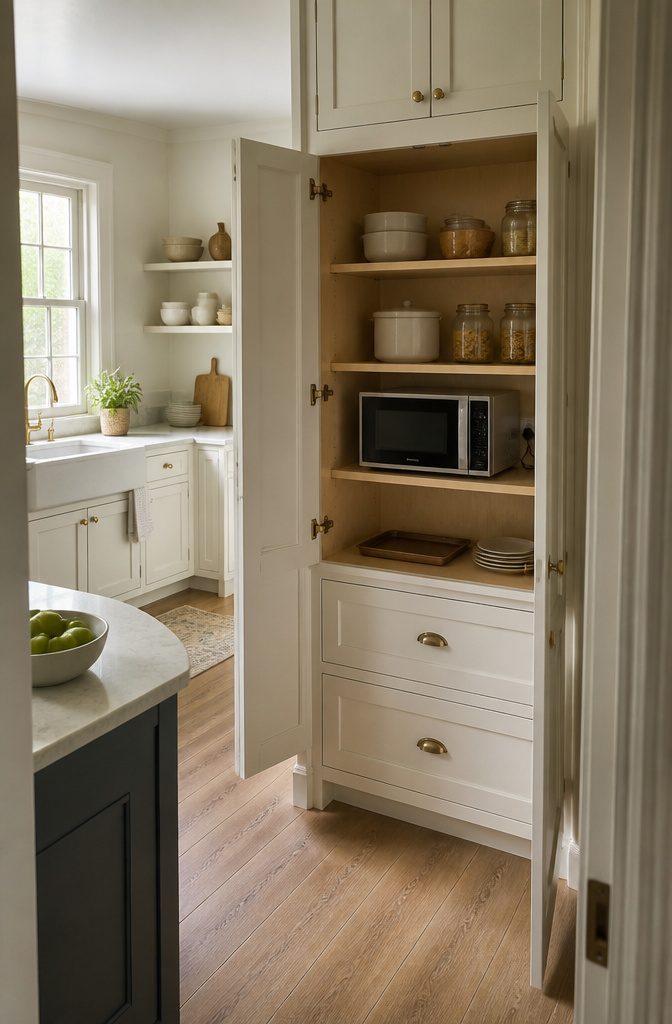
Moving the microwave into a cupboard or pantry gets it off the counter entirely and leaves no vent to clean. A built-in microwave needs a venting frame, and that frame collects greasy dust that becomes a chore to scrub.
A cupboard or walk-in pantry keeps the microwave easy to reach, requires no venting, and hides the appliance when you’re not using it.
The one catch: you will need an electrical outlet inside the cupboard or pantry if one is not already there.
Installing an outlet is straightforward work for an electrician, and you get a clear counter with no appliance sitting in view. The microwave stays plugged in, ready to use, and the door closes on it when you’re done.
10. Keep Appliances on a Rolling Cart

A rolling cart keeps appliances ready to use but lets you move them out of sight when you want the counter clear.
The ones worth considering range from a bare-bones Amazon Basics shelf at $48.98 to a StyleWell cart at $269.23 that reads more like a finished piece of furniture.
IKEA’s Räskog utility cart sits in between at $39.99, and it pairs with the Högsma cutting board for $9.99 to add a prep surface on top.
The simplest setup is to leave the cart in a corner of the kitchen where it doesn’t interrupt the work triangle.
If you have pantry space or a doorway nearby, you can roll the whole thing out of the room when guests arrive.
For carts with open shelves, baskets hide what’s stored below without adding much bulk, or you can hang a curtain across the lower tier if the frame allows it.
11. Cover Appliances Left on the Counter

When cabinet space runs out and the counter stays cluttered, a fabric or quilted cover does what built-in storage cannot: it hides what you leave out.
A cover made for the appliance—sized for a stand mixer, a toaster oven or an air fryer—costs fifteen to twenty dollars and keeps dust off between uses.
The fit matters more than the material: a cover that drapes too low looks sloppy, and one that barely reaches leaves the bottom edge exposed.
Canvas holds its shape better than lightweight polyester, and a quilted cotton cover with a padded layer protects appliances from countertop scuffs when you slide them forward.
Making one from fabric remnants saves nothing if you already own a sewing machine, but most people buy them ready-made and replace them when the first one wears through.
A cover works best on appliances used weekly rather than daily, since pulling it off and folding it back on becomes one more step in a routine that already has too many.
12. Hang a Curtain as a Cabinet Front

A tension rod and a curtain turn an open shelf into closed storage without drilling or measuring for cabinet doors.
The rod slots between the shelf sides, the curtain hangs from it, and you pull the fabric aside when you need the toaster or the blender.
The setup costs under $25 for both pieces—a two-pack of tension rods runs about $9, and a simple curtain starts around $16.
The fabric hides what sits on the shelf but keeps everything within arm’s reach, which matters when you use something daily but want the counter clear.
A boho print or a plain linen panel lets the curtain read as decor rather than as a cover-up.
If the shelf depth varies or the rod does not grip well, the curtain sags or the rod slips, so measure the opening width before ordering.
13. Roll Appliances on a Wheeled Plant Caddy

A plant caddy solves the problem of appliances stored on the pantry floor: roll them out when you need them, roll them back when you’re done.
The caddy sits flat, takes almost no vertical space, and means you aren’t lifting a stand mixer or food processor every time you want to use it.
The caddies made for this are low-profile wheeled platforms, usually round, that sit a couple of inches off the floor.
Some come in sets so you can match storage across multiple appliances. A wooden version with caster wheels fits kitchens that lean rustic or farmhouse; a plain plastic disc disappears under the appliance and costs less.
This works best when the pantry floor is level and the appliance heavy enough that you want wheels under it.
Light items like a blender don’t gain much, but anything over fifteen pounds becomes easier to move without dragging it across tile or hardwood.
14. Remove or Relocate Appliances You Rarely Use

The fastest way to reduce clutter is to get rid of appliances you don’t actually use. A toaster that only toasts bread becomes unnecessary if you already own an air fryer or use the oven.
The same logic applies to duplicates: keeping an Instant Pot while donating a Crockpot cuts the appliance count without losing function. Combination appliances work the same way — a toaster-fryer takes up less counter space than two separate machines.
For niche tools like food processors or stand mixers that come out once or twice a year, moving them to a storage closet or basement frees up kitchen real estate without throwing anything away.
The appliances you keep should earn their place by getting used regularly, not by sitting on the counter because you might need them someday. Streamlining what stays makes every other storage solution in this list easier to implement.
15. Leave Everyday Appliances Visible

Not every appliance needs to disappear. The coffee maker you use twice before breakfast and the toaster that runs every morning can stay right where they are.
Tucking them away only to pull them back out ten minutes later wastes the effort of hiding them in the first place.
A countertop with a few well-used pieces reads as a kitchen someone actually cooks in, not a staged photo that falls apart the moment you need to make toast.
The appliances you reach for daily earn their spot on the counter, and leaving them visible keeps the workflow intact without the shuffle of opening cabinets and hauling things out every time you want coffee.
The line falls where convenience tips over into clutter.
Three or four appliances that see daily use can hold the counter without crowding it. Past that, the visual weight piles up and the kitchen starts to feel junked rather than lived in.
Place Storage Near Outlets and Your Work Area

Appliance storage works only if the outlet is already there. Before you pick a cabinet, drawer, or shelf, check where your plugs land.
A mixer stored three feet from the nearest socket means unplugging the toaster every time you bake, and a pantry microwave is useless until you run power to it—an electrician’s visit that adds cost you didn’t plan for.
I put storage within arm’s reach of the outlet the appliance will use. A blender lives in the cabinet nearest the outlet it plugs into, not across the room where I like the look better.
The garage-door cabinet under my counter stays within a foot of its outlet, so the coffee maker and food processor can stay plugged in behind the door and pull forward without a cord trailing across the workspace.
Group by use, not by size. The stand mixer goes near the outlet closest to where I roll dough, which puts it next to the scale and the flour canister rather than stacked with other heavy appliances somewhere less convenient.
A pantry microwave needs the outlet installed if the wall doesn’t have one—mention that to the electrician before the cabinet goes in, because fishing wire through finished cabinetry costs more than doing it right the first time.
Match Storage to How Often You Use Each Appliance

The coffee maker you turn on every morning deserves a completely different home than the bread machine you fire up twice a year. Frequency decides everything about where an appliance lives and how easy it should be to reach.
Blenders, toasters, and coffee makers that run daily belong where you can grab them without opening a door or bending low—the appliance garage above drawer-based cabinets keeps them hidden but puts them right at counter height when you slide the door up.
Items used less often—juicers, roti makers, sandwich toasters—can go deeper into pantry cabinetry or onto a lower pantry shelf where you’ll wheel them out only when needed.
Think through the actual motion: if you use it standing at the counter, store it near the counter.
If it only comes out for weekend projects or seasonal cooking, tuck it away in taller cabinetry where the extra reach or the squat to retrieve it won’t slow you down on a weekday morning.
Frequently Asked Questions
What is an appliance garage in a kitchen?
An appliance garage is a built-in cabinet with a door that stores small appliances like coffee makers, blenders, and toasters out of sight while keeping them accessible.
Roll-up, flip-up, or bi-fold doors let you open the cabinet, use the appliance, and close it again without the appliance taking up counter space. Most sit at counter height so you can slide appliances straight out without lifting.
What types of appliances can I store in an appliance garage?
Coffee machines, blenders, toasters, food processors, electric kettles, sandwich makers, and juicers all fit in an appliance garage. Any small appliance you use regularly but want off the counter works, as long as it fits the cabinet depth and height.
If you run an outlet inside the cabinet, you can use some appliances without pulling them onto the counter at all.
Do appliance garages take up extra space in the kitchen?
Appliance garages fit into existing cabinetry at counter height and do not require additional floor space.
Roll-up tambour doors work best in compact kitchens because they disappear into the cabinet instead of swinging into your workspace. Bi-fold or lift-up panels suit larger layouts where clearance is not tight.
Will adding an appliance garage increase my kitchen’s value?
A clutter-free counter appeals to buyers, so built-in appliance storage may add resale value when you sell.
An organized kitchen with hidden appliances reads as more finished than one with toasters and blenders lined up on every surface. The effect is similar to other built-in storage upgrades that make a kitchen feel more intentional.
Where is the best place to install an appliance garage?
The best placement depends on how you move through the kitchen.
Near a coffee station if that is where your morning starts, beside a prep area if you blend or chop daily, or tucked into a corner by the sink if that is the only dead space you have.
Choose a spot where the outlet can be inside the garage so appliances stay plugged in and ready to use.