You can frame a round mirror for under $30 in materials and finish it in a weekend, but most builds fail at the circle cut.
A router jig gives you a perfect arc if you’re willing to make shallow passes and vacuum between each one; a jigsaw is faster but leaves rough edges that need heavy sanding and wood filler before the frame looks clean.
1. Choose Your Mirror Size and Frame Width
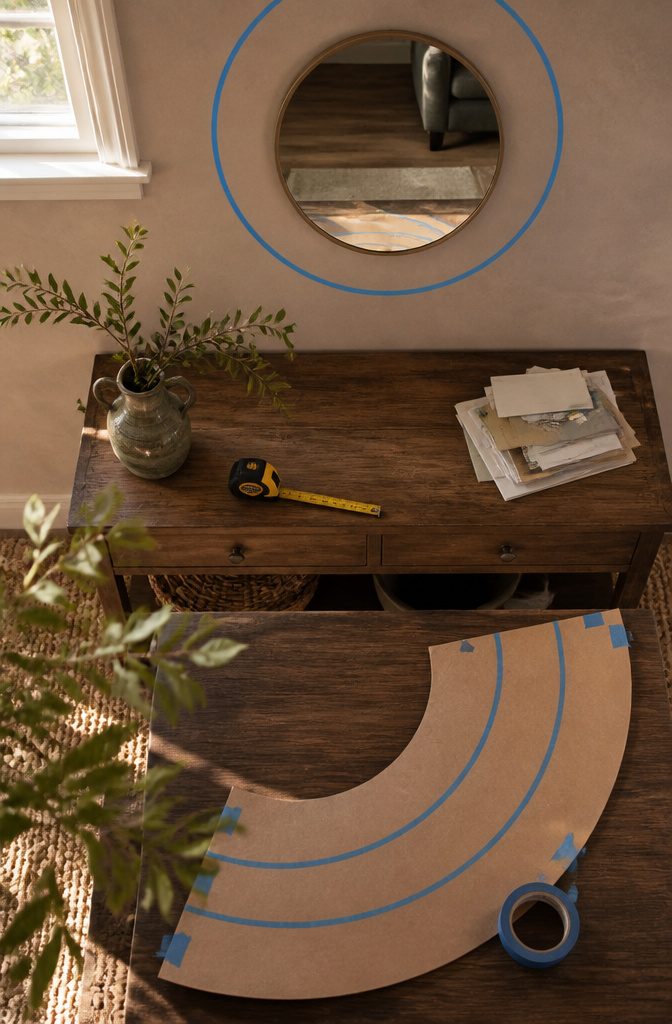
The mirror diameter and the frame width are decisions that need testing on the wall before you build anything.
Tape is faster than cardboard for this. Run blue tape around the perimeter of the proposed mirror, then add more tape outside it to show where the frame edge would land.
Step back, adjust the diameter, widen or narrow the frame, and keep trying until the proportions look right for the space. Once the layout feels good, measure and round to whole inches to simplify layout in the shop.
One documented build used a 24-inch mirror with a 4-inch-wide frame, which covered half an inch of the mirror edge and left 23 inches visible. Another used a cardboard template to establish the layout.
Both approaches give project-specific dimensions rather than a formula you can apply directly. The width that reads right depends on the mirror size and the room around it, so the tape test saves more trouble than any calculation.
2. Cut and Prepare the Frame Stock

The lumber preparation splits on how you want the frame to look. A segmented ring needs individual pieces cut to exact angles, while a plywood blank gets cut as one oversized square and rounded later.
For the segmented approach, pine planed to ¾ inch thick works well and stays light enough to hang without heavy anchors.
The angle at each end depends on how many segments you use. Six pieces need opposing 30-degree miters on each board cut to 15⅜ inches, which closes the ring at a smaller diameter.
Eight segments drop the angle to 45 degrees per cut, spreading the frame wider. Twelve segments would need 30-degree miters again but measured differently.
The math locks those angles: eight pieces at 45 degrees or twelve at 30 degrees both form a closed shape, but the segment count changes the frame diameter even if the mirror stays the same size.
The square-blank method skips the angle fuss entirely. Four pieces of 2×6 lumber cut to 26 inches with 45-degree mitered ends form a square frame, which you then round with a jigsaw or router after assembly.
That square gets joined with 2½-inch Kreg screws, and the circular cut happens once the frame holds together.
3. Assemble the Frame Blank
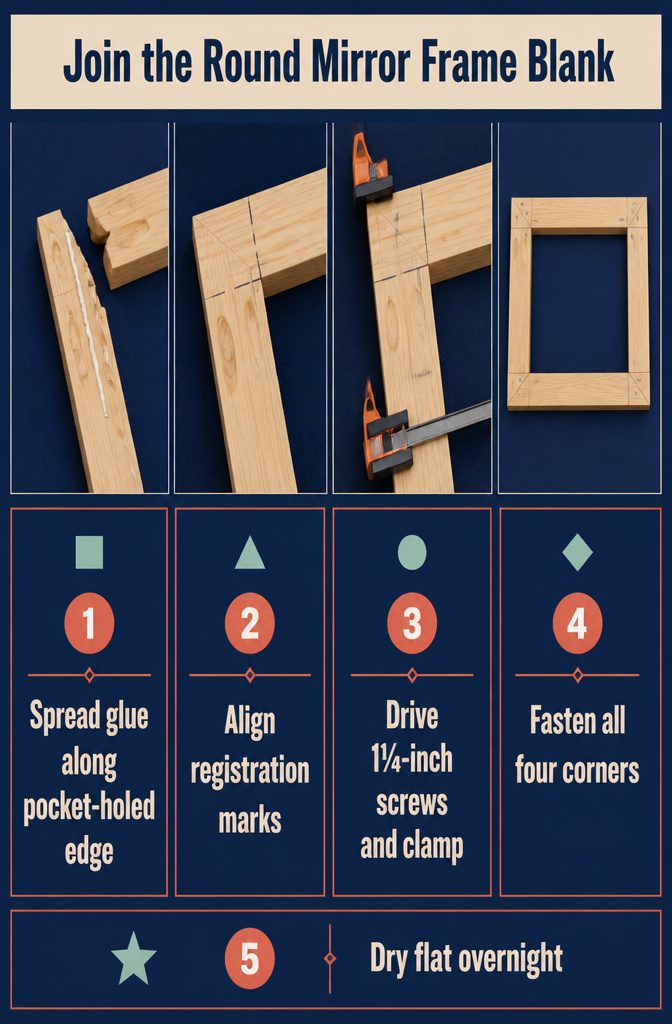
Join the frame pieces with pocket holes and wood glue, clamping each corner as you go.
Position one piece flat, spread glue along the edge with the pocket holes, align the registration marks you made earlier, and drive 1¼-inch screws to lock the joint.
Work around the square until all four corners are fastened, then leave the assembly flat and let the glue dry overnight before you touch it again.
Watch the placement when you drill those pocket holes. Too close to what will become the frame’s inside edge and the holes show after you cut the circle.
Stay at least ⅞ inch in from the traced mirror line and a full half-inch from the inner tracing line that marks your frame width. One pocket hole per corner is enough for a light mirror; heavier glass calls for two.
Some builders skip the square assembly and cut the circle straight from plywood instead, which saves the joinery step but gives you less control over grain direction and fewer options for wood species.
4. Cut the Round Frame Shape
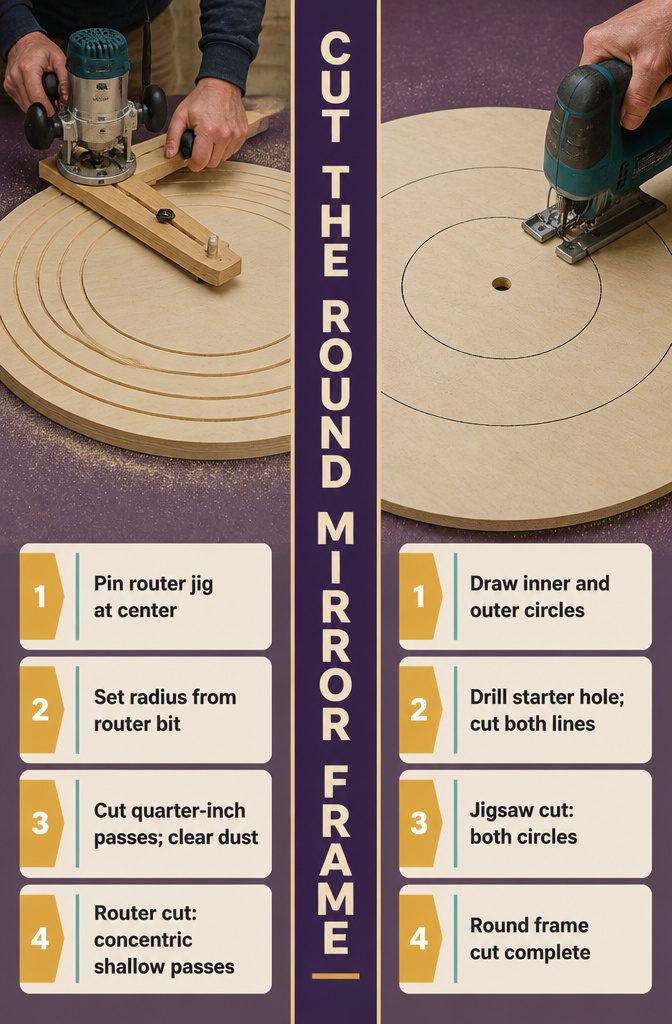
Two methods handle the circle cut: a router jig that pivots from center, or a jigsaw working freehand or guided by a drawn line.
The router jig pins to the center of your workpiece and holds the router at a fixed radius while you make repeated shallow passes.
For a 25.5-inch frame, drill a pilot hole 12⅝ inches from the router bit to account for the bit’s thickness, secure the jig with a screw through that hole into the center of your blank, and cut in quarter-inch increments, vacuuming between passes to clear dust and keep the cut line visible.
A 29-inch frame built from plywood calls for a 14.5-inch radius jig; shorten the jig by three inches for the inner cut if you want a three-inch-wide frame.
The router gives you a perfect arc but ties you to shallow cuts and a lot of cleanup.
The jigsaw skips the jig and cuts both circles in one go.
Draw your inner and outer radii using a pivoting paintstick or trace a cardboard template, drill a starter hole inside the inner circle to give the blade entry, and cut both lines.
The jigsaw is faster and needs no repeat passes, but keeping a smooth curve depends on your hand and how carefully you follow the line.
5. Form the Mirror Seat and Add Trim

The mirror needs a ledge to sit in, and you have two ways to get there.
The first is cutting a shallow rabbet about ¼ inch deep into the back of the frame, the same kind of recess you see on a picture frame.
A router makes quick work of this if the frame is already cut to its final round shape.
The second approach skips the router entirely: stack two plywood circles, one slightly wider than the other, and glue them together with the edges aligned. The overhang from the larger circle becomes the lip.
If you add decorative trim around the perimeter, the work gets longer but the result feels more finished.
One builder cut ten separate pieces on a bandsaw, dry-fitted them to check the joints, then glued and brad-nailed each piece from the back.
That setup dried overnight. Overlap the ends slightly when you lay them out, mark where they meet, then trim the excess with a handsaw before gluing and nailing them down.
If you plan to use mirror adhesive only, the lip step can be skipped entirely.
6. Sand, Fill, and Finish the Frame

Sand the frame thoroughly with both an orbital palm sander and a corner sander to smooth all surfaces. Fill any visible pocket holes near the edges with stainable wood filler, and fill the joints where the frame segments connect.
If you used a jigsaw to cut the circle, fill gaps and uneven spots along the outer and inner edges—jigsaw cuts are rarely perfect, and filler erases those discrepancies. Let the filler dry completely, then sand again.
Pine can stain unevenly and end up blotchy without prep. Apply a pre-stain wood conditioner and let it sit for a few hours before staining.
Stain both the front and back of the frame; the back edge reflects faintly in the mirror, and an unstained back looks unfinished in that reflection. Early American and American Walnut are both good choices if you want warmth.
Two coats give better depth. High humidity can keep stain tacky longer than the label claims, so plan for overnight drying at minimum.
Seal with polyurethane for durability. If you prefer paint, black acrylic with a glossy polyurethane topcoat gives an industrial look that pairs well with large round mirrors.
7. Attach the Mirror and Hang It
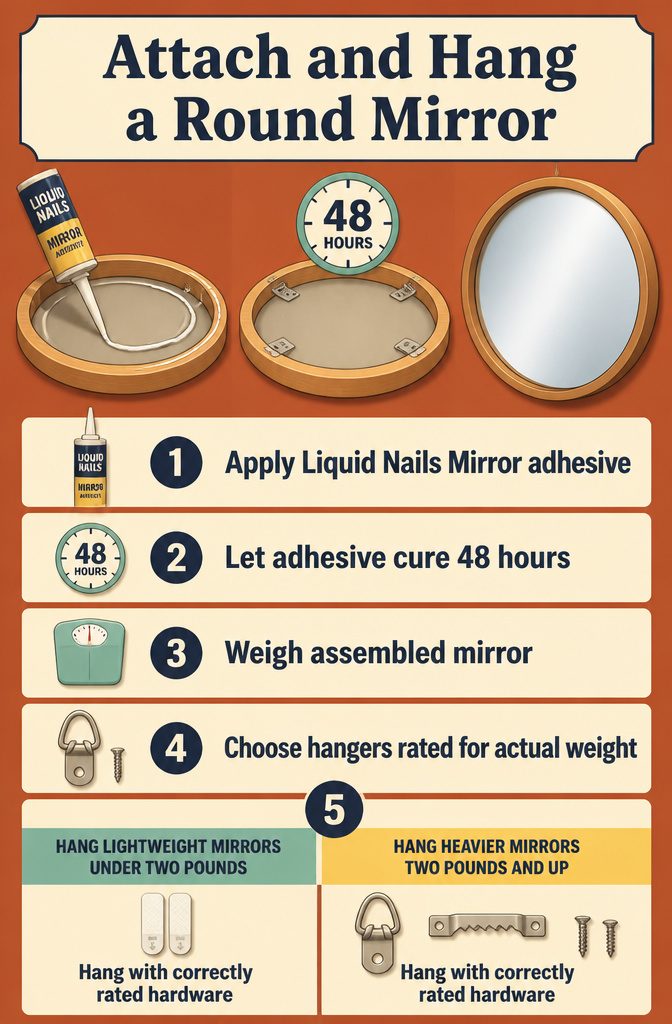
I attach the mirror with Liquid Nails Mirror adhesive and let it cure a full 48 hours before hanging.
Some builders prefer screwing in four mending plates so half of each plate extends over the rabbet, then flipping the frame and pressing the mirror onto adhesive-coated plates.
Either way works, but the adhesive-only method keeps hardware invisible from the front.
For lightweight mirrors under two pounds, Command strips rated to four pounds handle the job without putting holes in the wall.
A ten-inch craft mirror hung this way stays put. Heavier frames need Picture hangers or D-rings sized to the actual weight, not what it feels like when you lift it.
I weigh the assembled piece on a bathroom scale before choosing hardware. A frame that drops off the wall usually had hangers rated one step too light.
Segmented Wood or One-Piece Plywood

You will make the frame blank one of two ways, and each changes what tools you need and what the finished ring looks like.
The segmented approach starts with straight boards cut to identical lengths, their ends mitered to form a many-sided polygon. You glue or pocket-screw the pieces together, then cut the circle out of that polygon with a router jig.
The wood grain runs in short visible strips, and the joints stay slightly visible even after sanding. This method needs a miter saw and a pocket-hole jig in addition to the router.
The one-piece plywood method skips the polygon step entirely: you cut two circles directly from a square of plywood, one for the outer diameter and one for the inner, using a router jig or a jigsaw.
The grain stays uniform but plain, and there are no joints to sand or fill.
If you already own a router and want to avoid buying a miter saw, plywood wins. If you want visible grain and own the miter saw already, segmented boards give you that.
Router Jig or Jigsaw
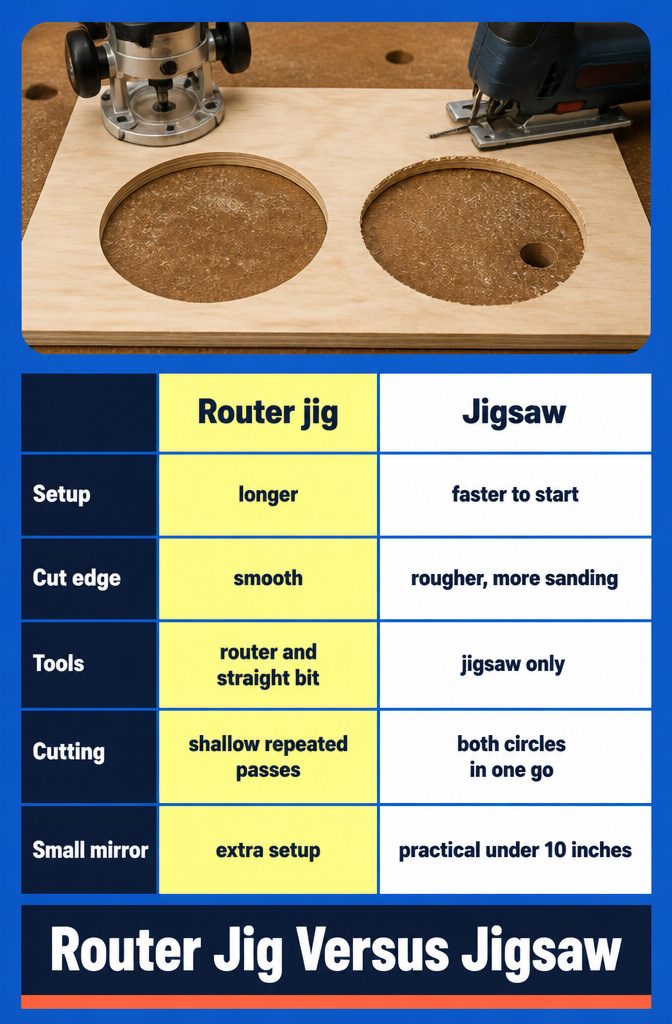
A router jig cuts the cleanest circle.
You drill a pivot point at the center of your plywood, screw one end of a long strip to the router base and the other through the pivot, then spin the router around in shallow passes until you break through.
The jig holds the radius constant, so the cut stays smooth and the frame width stays exactly what you set it to.
If you want a 3-inch frame, you move the pivot screw 3 inches closer and make a second pass for the inner circle.
The setup takes longer than the actual cutting, and you need a router and a straight bit with either a quarter-inch or half-inch shank.
A jigsaw is faster to start and needs only the saw itself. Drill a starter hole inside what will become the frame opening, drop the blade through, and follow your traced line around both circles.
The edge comes out rougher than a router cut, which means more sanding before you can finish the wood, but you skip the jig and the multiple passes.
For a small mirror under 10 inches, a jigsaw and a steady hand get you there without bringing out extra tools.
Working Out Segment Length and Angle
Figuring out how long each segment needs to be and what angle to cut sounds like the kind of thing that should have a formula. It doesn’t.
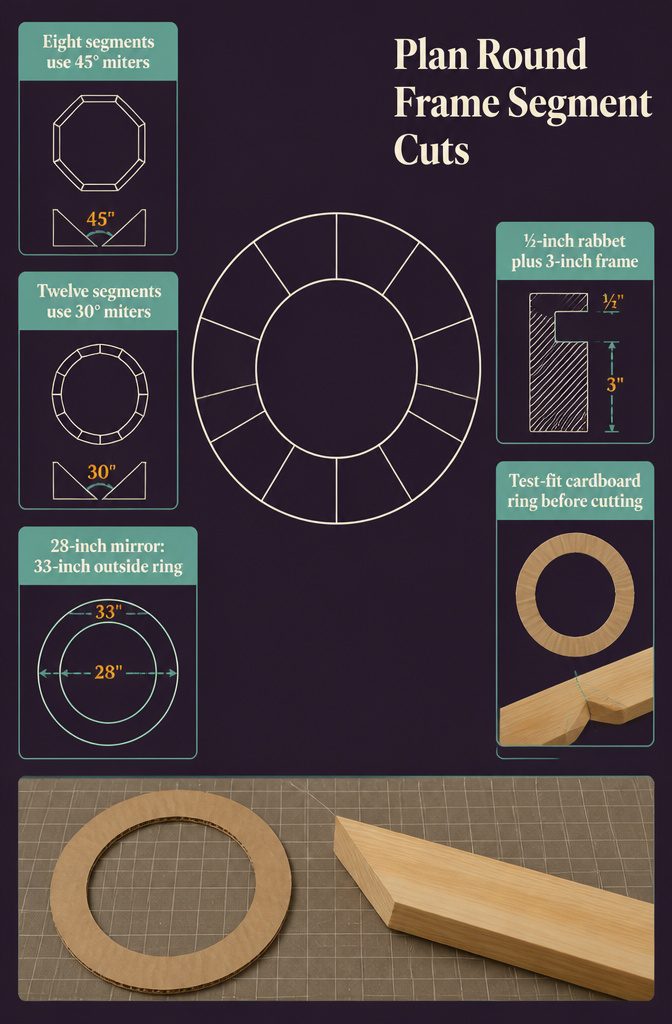
The angle itself is straightforward: eight segments use 45-degree mitered ends, twelve use 30-degree ends. Eight times 45 equals 360, twelve times 30 equals 360, and you can keep dividing from there if you want more pieces in the ring.
The segment length, though, is trial and error.
Cut a cardboard ring at the dimensions you settled on in the last step. For a 28-inch mirror with a ½-inch rabbet and a 3-inch frame width, that ring would measure 33 inches across the outside.
Take a board longer than you need, cut the miter on one end, set it against another board acting as the next segment, lay the cardboard ring on top and mark where it lands.
That mark is your cut line. Test-fitting beats calculating every time.
Cardboard and Stick Craft Alternative

If you’d rather skip the power tools and keep this simple, cardboard and sticks get you a framed mirror for about $6.
The frame uses a 10-inch round mirror glued to cardboard backing that extends at least 2 inches past the mirror’s edge, with sticks hot-glued over the exposed cardboard.
You’ll need a box cutter or razor blade to cut the cardboard circle (scissors struggle and make a ragged edge), a hot glue gun, a pencil for tracing, and enough sticks to layer the frame until the cardboard disappears.
Optional Command strips rated for 4 pounds each will hang the finished piece, and the mirror itself weighs under 2 pounds.
The glue sets fast, so the mirror cannot be repositioned once it touches the cardboard. Trace a guide circle before you commit.
This is a craft approach rather than a woodworking build, and it shows: the frame is lightweight, the sticks bend and curve differently from one to the next, and you’ll spend time picking which ones sit together cleanly.
For a rustic look on a tight budget, it works.
What These Projects Cost
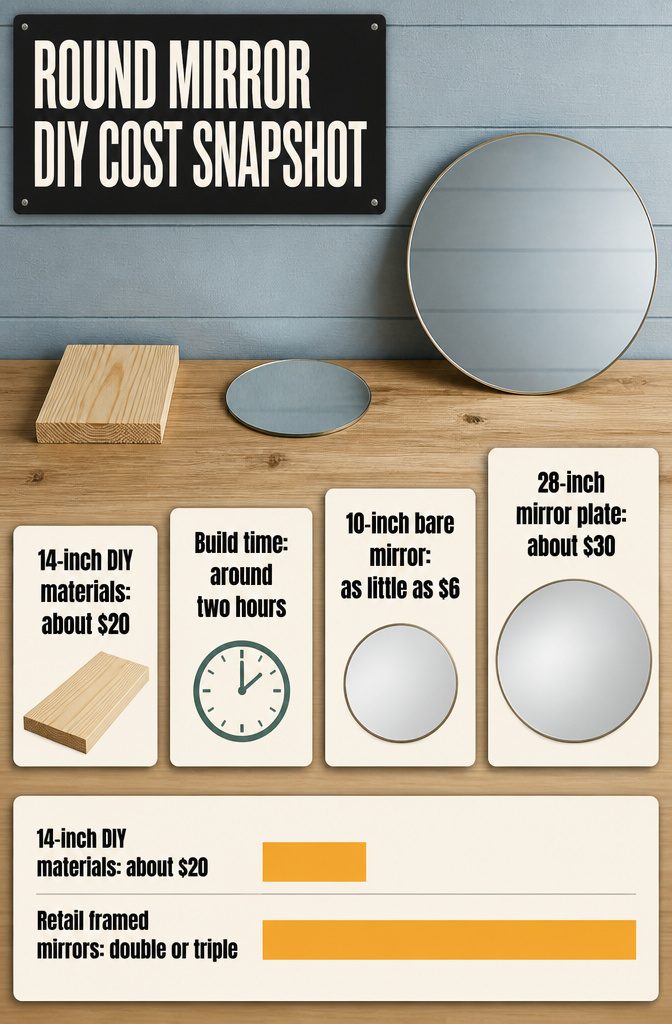
Framing your own mirror costs far less than buying one ready-made, and the difference widens as the size goes up. A 14-inch mirror built from one 1×8×8-foot board runs about $20 in materials and takes around two hours.
A bare 10-inch mirror plate can cost as little as $6, while a 28-inch round mirror alone goes for $30 before you add any frame at all. Retail framed mirrors in those sizes easily double or triple the total.
Cost scales with two things: the diameter you’re framing and the wood you pick. Pine and poplar stay cheap, oak and walnut climb quickly, and plywood circles cut to size land somewhere in the middle.
The segmented approach uses less wood than routing a full circle from a single blank, but both methods stay well under what a finished piece costs in a store.
Frequently Asked Questions
How to frame a round mirror DIY?
Cut a circular frame from either segmented wood pieces mitered together or a single plywood blank, sand and finish it, then attach the mirror with adhesive rated for glass.
The frame can sit as a rabbet cut into the back or as a stacked double-layer with the top layer forming a lip. Total time runs 2–3 hours plus drying, and materials cost $6–$30 depending on mirror size and wood choice.
How can I make a simple mirror frame myself?
The simplest version uses cardboard and craft sticks hot-glued around a $6 plate mirror for under $10 total.
For a wood frame, cut 4 boards to length with 45-degree mitered corners, join them into a square with pocket screws and glue, then cut the circle with a jigsaw or router. Both methods take 2 hours or less.
How to put a frame around an existing mirror?
Build the frame to fit the mirror’s diameter plus the desired frame width, then attach it with mirror adhesive or mending plates.
If the mirror is already mounted on a wall, you can glue trim pieces directly to the wall around the perimeter rather than building a removable frame. Adhesive rated for mirror glass holds without visible hardware from the front.
How to make a circular frame?
A router jig pivoting from center gives the cleanest cut: drill a pivot hole at your desired radius, attach the jig to both the router and the center point, then make shallow passes until you break through.
A jigsaw works faster if you can follow a traced line steadily, but the edge needs more sanding afterward. Both methods work on plywood blanks or pre-assembled segmented wood.
How to frame a mirror with no frame?
Measure the bare mirror, add your desired frame width to find the outer diameter, then build a circular frame using wood or plywood.
Attach the mirror to the back of the frame with Liquid Nails Mirror adhesive and let it cure 48 hours before hanging.
A shallow rabbet cut into the frame back holds the mirror securely, or stack two plywood rings so the larger one forms a retaining lip.