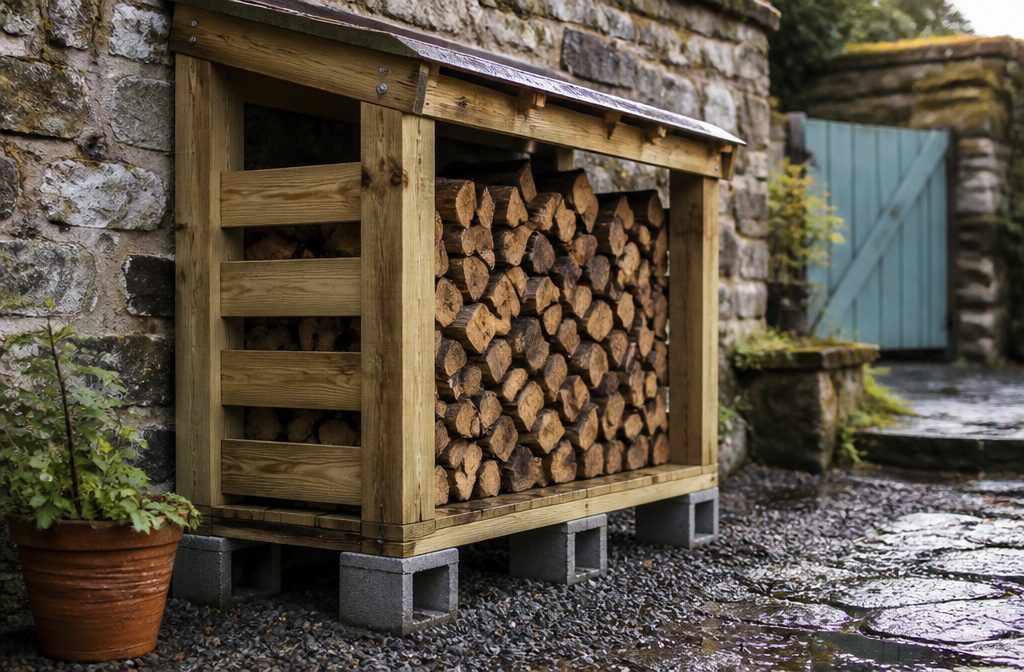
A firewood shed 5 feet wide and 3 feet deep costs around $150 in lumber and hardware and takes a weekend to frame, side and roof.
Most builds fail at the base: setting posts directly in dirt instead of on gravel and blocks lets the frame settle unevenly, and the whole structure leans within a season.
Lehman Lane’s design lifts pressure-treated 4×4 posts onto cinder blocks over tamped stone, then uses 15-degree roof cuts to shed water without adding complicated joinery.
1. Site and Ground Preparation
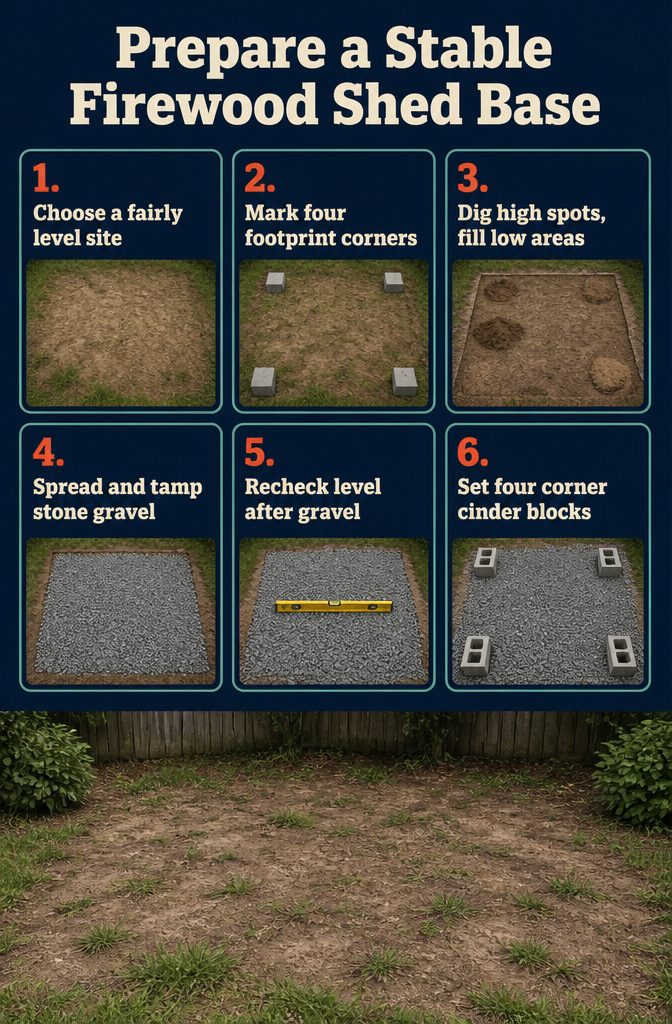
- Stake out a fairly level spot where the shed will sit. The ground does not need to be perfectly flat at this stage, but choosing a spot without major slopes saves work later.
- Mark the four corners with stakes or cement blocks so you know exactly where the shed footprint starts and ends.
- Dig out any high spots and fill low areas with dirt to bring the ground closer to level across the marked area.
- Spread stone gravel over the leveled dirt and tamp it down. The gravel layer creates a stable, draining base that keeps the shed posts from sitting directly in mud.
- Check level again after the gravel is in place. Small adjustments now prevent the whole structure from leaning once the frame goes up.
- Set four cinder blocks on the gravel at the four corners. These blocks give the pressure-treated posts a solid surface to rest on and lift them off the ground enough to stay dry.
2. Base and Floor

- Cut two 4×4 posts to 5 feet and notch each one 3½ inches wide and 1½ inches deep. These notches hold the frame boards that sit on top.
- Attach three 2×4 boards, each cut to 5 feet, across the notched posts using 3-inch deck screws. Pre-drill the holes so the wood doesn’t split.
- Add the rear posts: cut two more 4×4s to 4 feet 3½ inches and connect them with another 5-foot 2×4 across the top. Screw everything together the same way.
- Set the assembled frame on four leveled concrete blocks at the corners, or on twenty cement blocks spread under the perimeter if you’re building a larger shed. Some builders add a pressure-treated rectangular base screwed together first, then place that base on the blocks.
- Lay the floor slats. Cut twelve 1×4 boards to 2 feet 10¾ inches and two more to 2 feet 3 inches. Space them 1 inch apart and fasten with 2½-inch deck screws. If you’re adding a plywood floor instead, ½-inch plywood works, though ¾-inch holds up better over time.
3. Posts, Sides, and Wall Framing
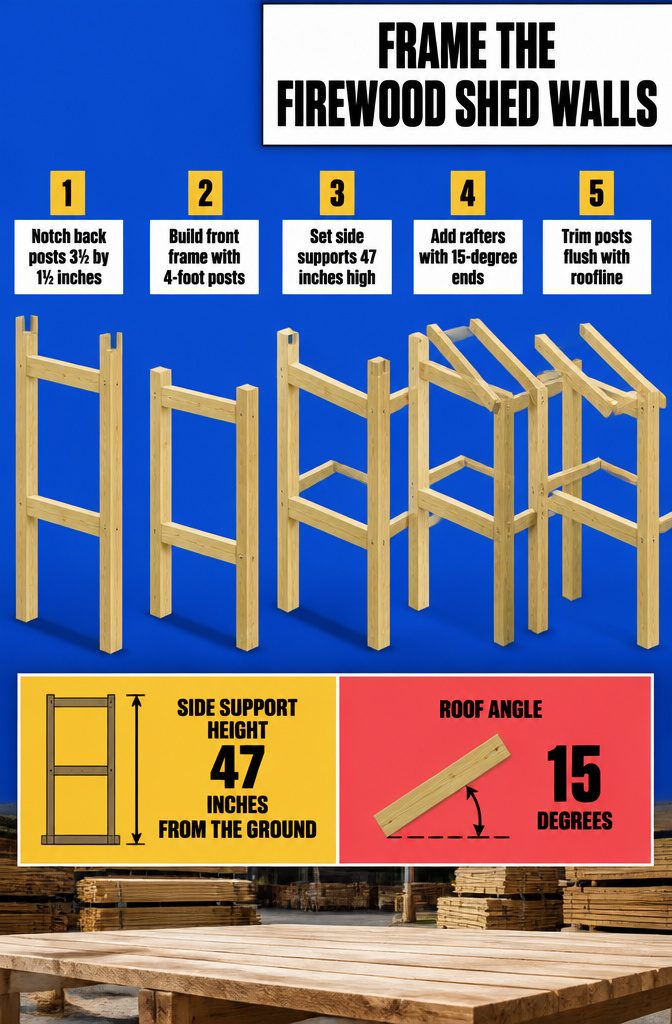
- Cut two 4×4 posts to 5 feet and notch each one 3½ inches wide and 1½ inches deep. These notched posts form the back frame. Pre-drill holes and attach a 5-foot 2×4 horizontally across both posts using 3-inch deck screws, then add a second 5-foot 2×4 below it.
- Cut the front posts from 4×4 lumber to 4 feet 3½ inches. Assemble them the same way with a 5-foot 2×4 spanning across, pre-drilling and driving 3-inch deck screws through each joint.
- Stand both frames upright and connect them with 5-foot 2×4s running front to back on each side. These side supports sit 47 inches from the ground and tie the front and back together into a box frame.
- Add angled 2×4 rafters to each side. Cut two 4-foot 2×4s with matching 15-degree angles on the ends, both angled the same direction. Pre-drill and screw them to the side frames where the posts meet the top horizontal.
- Trim the front posts flush with the angled rafters so nothing sticks up past the roofline. Then cut two 5-foot 2×4s with 15-degree bevels and fasten them across the front and back as roof supports, one at the peak of each frame.
4. Shelves, Back, and Side Cladding
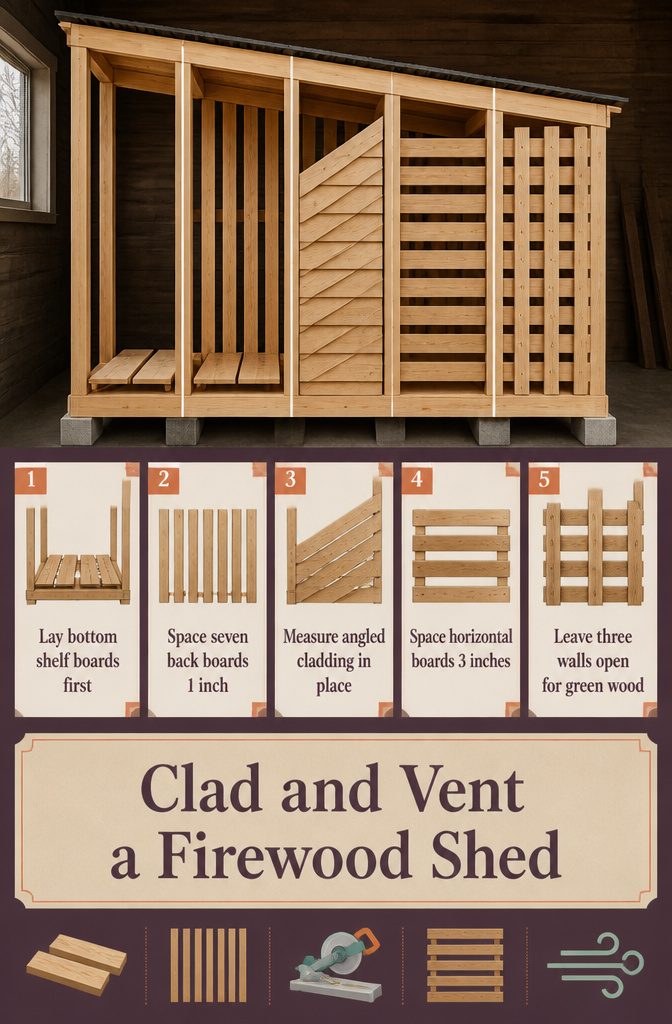
- Add the bottom shelf boards first. I center two boards across the base to give the floor structure, then run two more along the front and back edges. Finish nails hold them down without splitting the wood.
- Attach seven boards vertically across the back wall, using a 1-inch spacer between each one. The gaps let air move through, which keeps the firewood dry. Finish nails work here too.
- Cut angled side cladding as you go rather than measuring everything up front. The posts rarely sit perfectly plumb, so measuring each piece in place keeps gaps tight. Cut one end at 22.5 degrees, hold it against the frame, mark the other end, then trim. Let each piece overlap the back boards by about 5/8 inch so the seam disappears.
- For horizontal cladding, space the boards 3 inches apart. If you want a crosshatch pattern, run vertical boards 3–4 inches apart over the horizontal ones. Cut the top ends at an angle so they clear the roof line without overlapping.
- Leave three walls open if you’re storing green wood. The airflow cuts drying time, and you lose nothing structurally by keeping the slat spacing wide.
5. Roof Framing
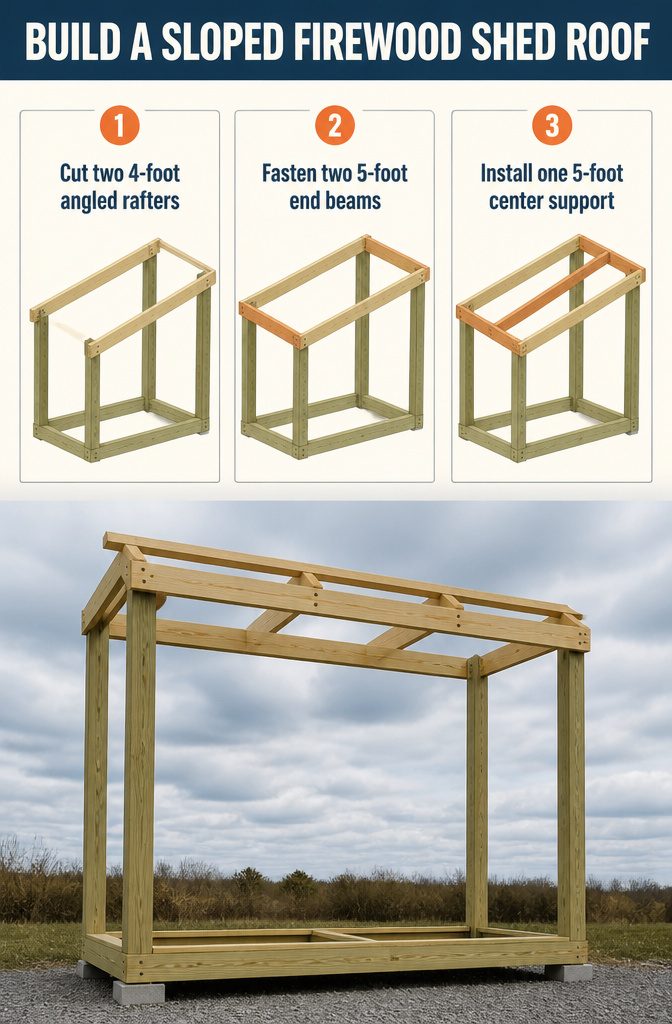
Roof Framing
- Cut two 2×4 rafters to 4 feet long, making 15-degree angle cuts on both ends in the same direction. Pre-drill holes and attach the rafters to the side posts using 3-inch deck screws.
- Cut two 2×4 boards to 5 feet long and make 15-degree bevel cuts on each. Pre-drill holes and fasten these boards to the front and back of the frame with 3-inch deck screws.
- Cut one more 2×4 to 5 feet long for the center support. Pre-drill and install it between the front and back boards using 3-inch deck screws.
The angled cuts let water run off instead of pooling, and the bevel ensures the roof boards sit flush against the frame.
I size the roof frame to match the floor dimensions so the structure stays square and the overhang stays consistent on all sides.
6. Roof Covering
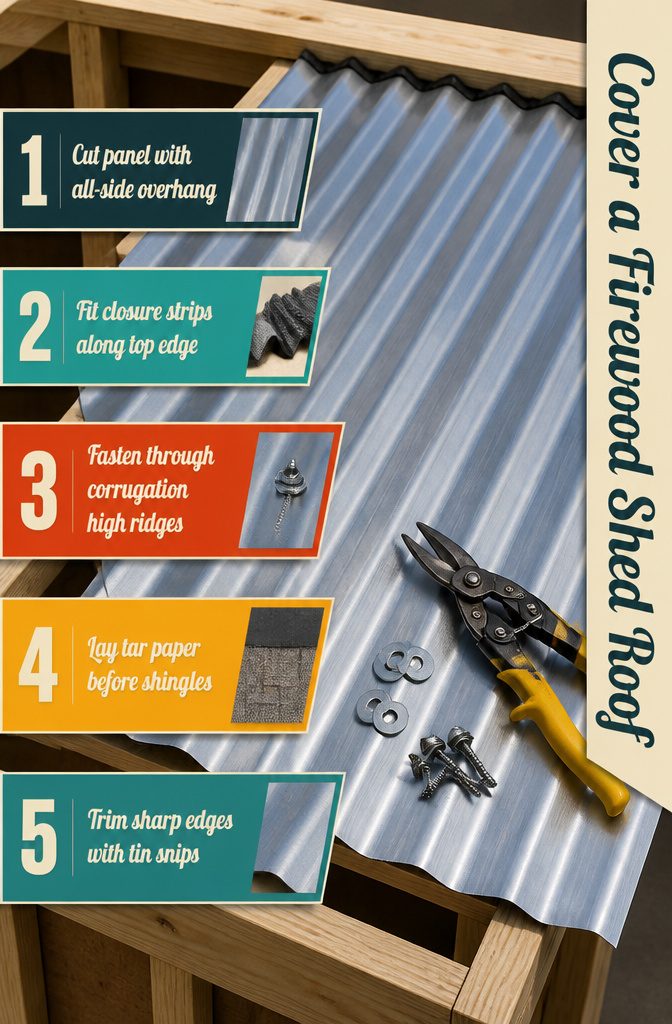
- Measure and cut the roof panel to size, allowing for overhang on all sides. Corrugated metal sheets are standard, though asphalt shingles over tar paper work too if you want the shed to match a house. Check the roofing manufacturer’s fastening instructions before you start.
- Install corrugated closure strips along the top edge of the roof frame where the panel will rest. These fill the gaps in the corrugated profile and keep weather out.
- Position the cut panel on the frame and fasten it with roofing nails or exterior screws fitted with washers. Washers spread the load and prevent the fastener from pulling through the thin metal. Drive fasteners through the high ridges of the corrugation, not the valleys.
- If using shingles instead, lay tar paper across the roof boards first, then nail shingles over it in overlapping rows from bottom to top.
- Trim any sharp edges along the metal panel with tin snips. Raw corrugated edges will slice skin when you brush past with an armload of wood.
7. Finish and Fill
- Sand the entire shed with medium-grit sandpaper, working in the direction of the grain. A vacuum with a soft-bristled brush pulls off most of the dust, and a damp lint-free cloth picks up what is left. Let the wood dry completely before moving on.
- Apply an exterior stain or paint made for fences or decks. I like a semi-transparent stain for a wood-grain look, but a solid-color product gives you an opaque finish. Follow the prep and application steps on the can exactly, including how many coats to lay down and how long each one needs to dry.
- Let the finish cure for the full time the manufacturer lists. Rushing this step means the stain can rub off on firewood or your hands.
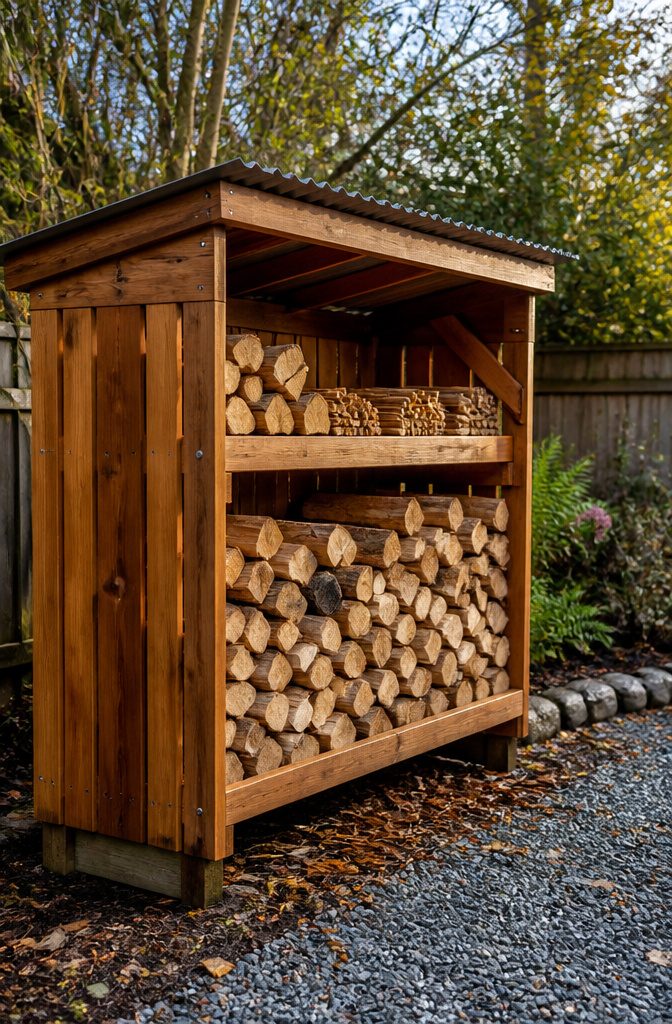
- Load the shed with firewood once the finish is fully dry. Stack split logs on the shelves and tuck kindling in any gaps. The shed is ready to use.
Materials and Build Components

The shopping list changes with the design, but several materials appear across most builds:
- Pressure-treated 4×4 posts for the frame — two at 5′ and two at 4′ 3½″ in one plan, or four 6′ posts in another
- 2×4 studs for floor joists, roof framing, and cross-bracing — counts range from five to ten boards depending on shed size
- Cedar fence pickets for siding and sometimes roofing — anywhere from fourteen to twenty-four 6′ pickets, cut to fit
- Corrugated metal roof panels — one to three sheets, with galvanized finish standing up better to weather than plain steel
- Closure strips to seal the gap between corrugated panel and frame
- 3″ deck screws for framing joints, plus 2½″ screws for attaching siding
- Roof nails with waterproof washers when fastening metal panels
- Cinder blocks and gravel for leveling the base in designs that skip a concrete pad
One build calls for composite or pressure-treated floor boards cut to fit the shed footprint.
Another lists plywood sheathing under the roof before tar paper and shingles go on. The Ana White plan specifies 2×6 boards for the side base and floor framing instead of 2×4s.
Construction Dimensions and Layout

Sheds range from narrow utility racks to deeper structures that hold a full cord. Lehman Lane’s build measures 97 inches wide by 43 inches deep, with a slant roof running from 83 inches tall at the front down to 55 inches at the back.
The inside dimensions come in at 87 inches wide by 40 inches deep, enough room for a cord of wood and a bit more.
Construct101’s design sits smaller at 5 feet tall in front, 4 feet 3.5 inches in back, with a 5-foot width and 34-inch depth.
Pretty Handy Girl’s shed lifts the roof supports to 47 inches above ground and sets the bottom shelf at 10 inches. One reader built from her plans at 6 feet high, 5 feet wide, and 20 inches deep.
| Build Source | Width | Depth | Front Height | Back Height |
|---|---|---|---|---|
| Lehman Lane | 97 in | 43 in | 83 in | 55 in |
| Construct101 | 60 in | 34 in | 60 in | 51.5 in |
| Pretty Handy Girl (reader) | 60 in | 20 in | 72 in | n/a |
Frequently Asked Questions
How to build a wood storage shed?
Level the ground and set cinder blocks at the corners, then build a base frame from 4×4 posts and 2×4 cross supports.
Add floor slats, stand the front and back post assemblies upright, and connect them with side boards. Install angled rafters, attach vertical or horizontal cladding with spacing for airflow, and fasten a corrugated metal roof panel over the frame.
What wood to build a shed out of?
Use pressure-treated 4×4 posts for the frame and pressure-treated 2×4 studs for floor joists, roof supports, and cross-bracing.
Cedar fence pickets work well for siding because they resist rot, and you can choose composite or pressure-treated boards for the floor. The roof frame uses standard 2×4 lumber cut to length with angled ends.
How much would it cost to build a wood shed?
The cost depends on size and materials, but a typical firewood shed requires four 4×4 posts, five to ten 2×4 studs, fourteen to twenty-four cedar fence pickets, one to three corrugated metal roof panels, cinder blocks, gravel, screws, and roofing nails with washers.
Salvaged fence boards or free pallets can lower the cost.
How to build a firewood storage rack?
Build a rectangular base from 2×4s resting on leveled cinder blocks, then attach vertical 4×4 corner posts at different heights to create a sloped roof line.
Add horizontal 2×4 cross supports between the posts, install floor slats spaced 1 inch apart, and run vertical or horizontal cladding boards along the sides with gaps for ventilation. Top the frame with angled rafters and a corrugated metal roof panel.