A properly designed patio with pavers, gravel base, and polymeric-sand joints runs $2 per square foot DIY or $5.75 installed, and the layout holds up for decades if the foundation drains correctly.
Most first attempts fail at grading: a slope between 1% and 2% away from the house is the only thing that keeps water from pooling against the foundation or turning the surface into a shallow lake after rain.
1. Decide What the Patio Is For
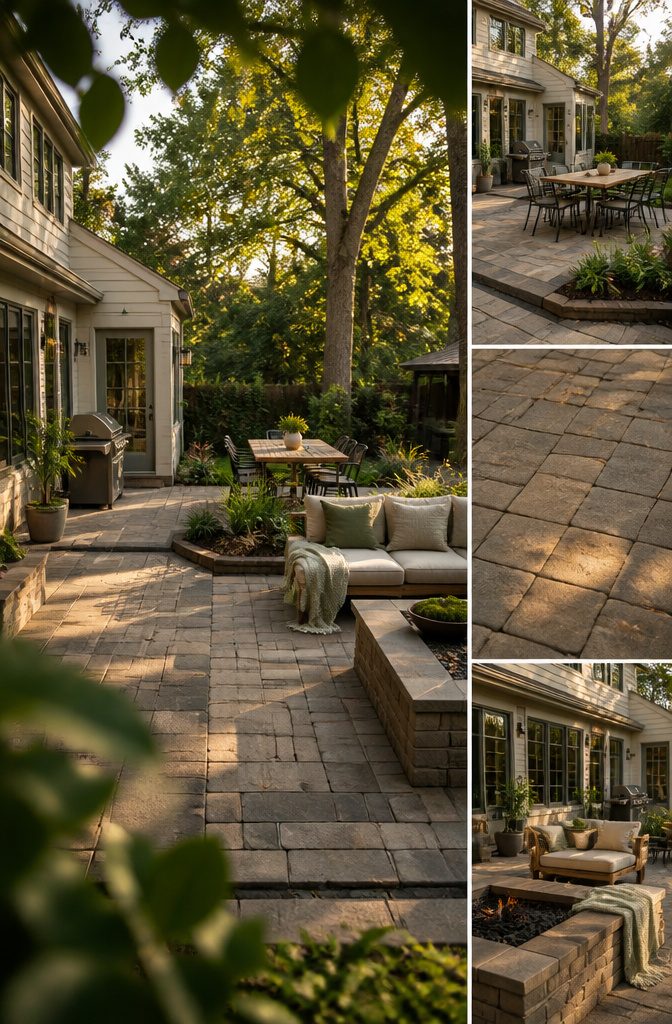
The intended use decides size, shape, layout, and what the patio costs.
A compact utility patio holds a grill or a potting bench and nothing else. A bistro patio fits two chairs and a small table for morning coffee or an evening drink.
An outdoor living room is built for lounging rather than eating, with a sofa, side chairs, and a coffee table that works for drinks and small plates but not full meals.
A dining patio needs enough room for a table, chairs that pull out comfortably, and a grill or smoker.
A multipurpose patio holds separate zones for cooking, eating, and relaxing, and may include an outdoor kitchen or fireplace. A fire pit patio centers on the fire feature, with chairs arranged for conversation.
The use also decides furniture spacing. Dining chairs need clearance to slide back.
Lounge furniture works better with softer edges and more space between pieces. A multi-use layout may need planting beds or changes in level to separate zones instead of one open rectangle.
2. Choose a Location by Reading the Site

The spot you pick makes or breaks how often you use the patio.
Start by sitting in a chair where you think the patio should go and stay there long enough to notice what the space actually gives you: sun at the time you would be out there, wind that funnels between structures, views worth framing or neighbors you would rather not see.
A flat area with decent drainage matters more than a pretty corner that pools water or slopes hard enough to need retaining walls.
Pay attention to what sits nearby. An air conditioning unit or trash bins close by will make the space less appealing no matter how well you build it.
If the yard has enough room and the uses support it, split the patio into separate areas instead of forcing one large slab into a compromised spot.
A small grilling area off the kitchen door connected by a path to a larger sitting area in the yard can work better than either alone, especially when access, privacy, or slope issues would make a single location fight the site.
3. Plan Size, Shape, and Movement
I start by sketching the patio on paper, mapping out where I want to cook, where people will sit, and where they’ll walk through.
Once the zones make sense, I mark the footprint with spray paint in the yard to see whether the shape actually works with the furniture I plan to use.
Then I draw it to scale so the measurements hold up when the material order goes in.
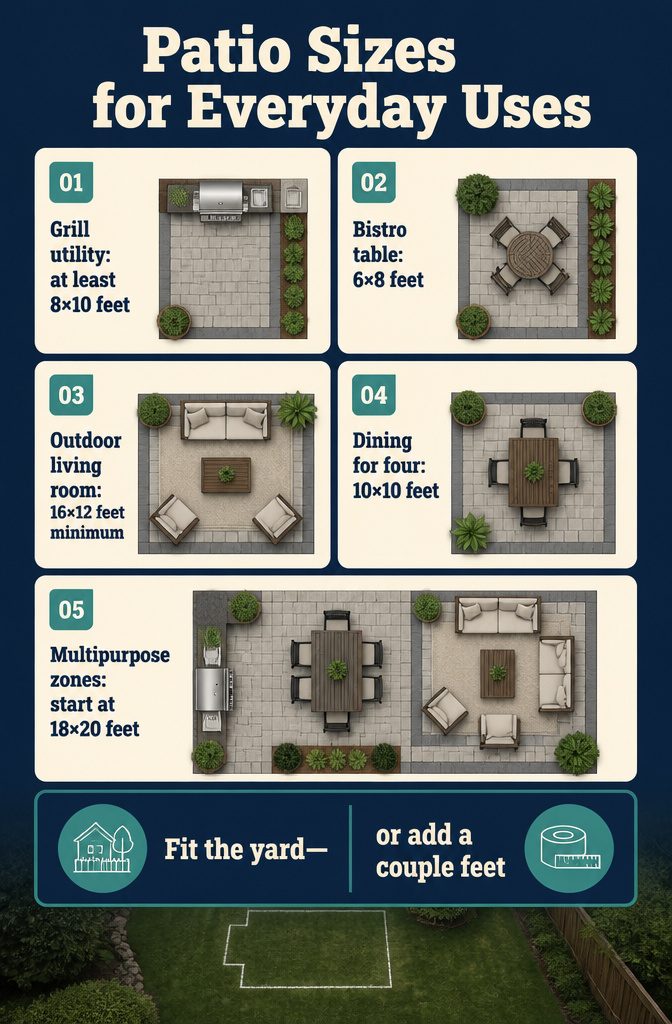
The size depends on what the patio has to do. A utility patio for a grill needs at least 8×10 feet; a bistro setup fits in 6×8 feet.
An outdoor living room with a sofa and chairs takes 16×12 feet minimum, while dining for four calls for 10×10 feet and six to eight people need 12×12 feet.
A multipurpose patio with cooking, dining, and seating zones should start at 18×20 feet, and a fire pit layout works at 15 feet diameter or 15×15 feet square.
Two ways to think about scale: fit the patio to the yard and the budget, or add a couple of feet if the space allows.
I’ve seen both work, but the regret tends to come from going too small rather than too large, especially when the furniture arrives and the clearance disappears.
4. Choose Materials to Suit the Home and Climate

Material choice locks in more than the patio’s look. It sets how often you’ll be sweeping, whether a freeze will crack the surface, and whether the install stays in DIY range or needs a crew.
Start with what’s stocked locally — freight on stone from three states over can double the cost, and a material that thrives in Arizona may buckle through a Pennsylvania winter.
Natural stone runs from bluestone to flagstone to slate, each quarried regionally with its own color and texture.
Finishes vary too: thermal gives a smooth face, natural cleft stays rough. Manufactured pavers mimic stone or brick in precast concrete, either as small interlocking blocks or large slabs for a modern line.
Clay pavers bring rich, fired tones that hold their color and wear for decades. Concrete splits into plain poured slabs and stamped versions with pattern and texture added.
Gravel offers the lowest cost and easiest install, though it needs edging, periodic raking, and a fresh layer every few years — and snow removal turns into a problem.
Wood or composite decking works on slopes where grading a flat base would mean serious excavation.
Get samples and set them against the house siding, fence, and plantings before you commit.
If samples aren’t an option, visit a hardscape supplier with outdoor displays. Thicker pavers handle furniture and grills better than thin ones.
Tile needs a concrete base and every component — tile, thinset, grout, sealant — rated for outdoor exposure. The pattern you pick and the sight lines from the door matter during this step, not after the base is in.
5. Plan Features, Zones, Shade, and Planting

Once footprint and material are settled, the design starts to carry weight. Built-in seating walls, fire pits, outdoor kitchens, pergolas, water features, and lighting turn a flat surface into a room you actually use.
A seating wall doubles as a low bench along the edge, handy for guests and for setting down drinks without dragging out extra furniture. A built-in fire pit anchors the gathering area.
Running a gas line under the patio before you pour or set pavers means you can hook up a grill or fire feature without refilling propane tanks, though that work requires a licensed professional.
Shade matters as much as seating.
A pergola gives structure overhead and slots in climbing plants or fabric panels. Shade sails run about $40 and handle full sun without permanent framing.
Umbrellas flex when the angle shifts. Water features add sound and movement but need weekly or bi-weekly treatments and pump care to stay clear of debris.
If budget runs tight, phase the extras.
Start with the patio footprint, then layer in fire, shade, or lighting over the next season. Keep circulation clear and tie the layout back to the door you’ll use most.
6. Check Codes, Permits, Grading, and Drainage

Before you pour the first paver or mix concrete, the local building department has an opinion on how you do it.
Most cities require a permit for patios over a certain square footage — often 120 or 200 square feet — and anything with steps, handrails or retaining walls needs approval even if the patio itself does not.
Call or check the website before you dig, because codes dictate setbacks from property lines, height limits for walls, and structural details for railings.
Grading matters more than most people expect.
A patio needs to slope between 1% and 2%, or one-eighth to one-quarter inch per foot, away from the house so water does not pool against the foundation or turn the surface into a shallow lake after rain.
If your yard does not drain well on its own, you may need to add a French drain or gravel channel at the low edge to move water off the site.
Steps follow their own rules.
Treads should measure 12 inches deep, and risers between 6 and 7 inches tall, with every step in the run identical so no one trips on a surprise height change mid-climb. Any run over 30 inches high usually requires a handrail.
If the patio sits more than a foot above grade or cuts into a slope, a retaining wall may be the only way to hold the soil in place, and walls over a certain height — often 4 feet — need an engineer’s stamp.
Ignoring drainage or slope is the mistake that turns a weekend project into a redo the following spring.
7. Prepare the Site and Foundation for a Paver Patio

- Mark the perimeter of the patio with stakes and string, then excavate the area about 8–10 inches deep. The depth accounts for the gravel base, sand layer, and pavers themselves, and gives you room to build a foundation that drains properly and stays level over time.
- Level and compact the ground at the bottom of the excavation. Use a hand tamper or plate compactor to press the soil into a firm, even surface. Loose dirt shifts under weight, so this step matters more than it looks like it does.
- Spread 6 inches of 3/4-inch clean gravel evenly across the compacted soil. This gravel size drains well and locks together under pressure. Compact it in layers if you are working with the full depth at once, checking that the surface stays level as you go.
- Add a 1-inch layer of sand over the compacted gravel. The sand acts as a bed for the pavers, filling small gaps and keeping them stable. Level it with a straight board dragged across guide pipes set at the right height, smoothing out any ridges or low spots before the pavers go down.
8. Install and Finish the Patio

- Lay the pavers in the pattern you settled on, working from one edge outward so you can check alignment without stepping on what you’ve already placed.
- Cut pavers where needed using a wet saw or splitter to fit edges, corners, and any curves in the layout.
- Fill the joints with polymeric sand, sweeping it across the surface until every gap between pavers is full.
- Compact the surface with a plate compactor to settle the pavers and lock the sand into the joints.
- Repeat the sand application, adding more polymeric sand to any joints that settled, then compact again.
- Add plants, lighting, and furniture to finish the space. I look for weather-resistant seating and low-voltage path lights that won’t need rewiring every few years.
At this stage, you can handle the work yourself or bring in a professional to guarantee the patio meets local codes and gets built correctly.
Either way, research the proper installation techniques for the materials you chose and follow safety precautions as you go.
Paver Patterns and What They Cost to Install
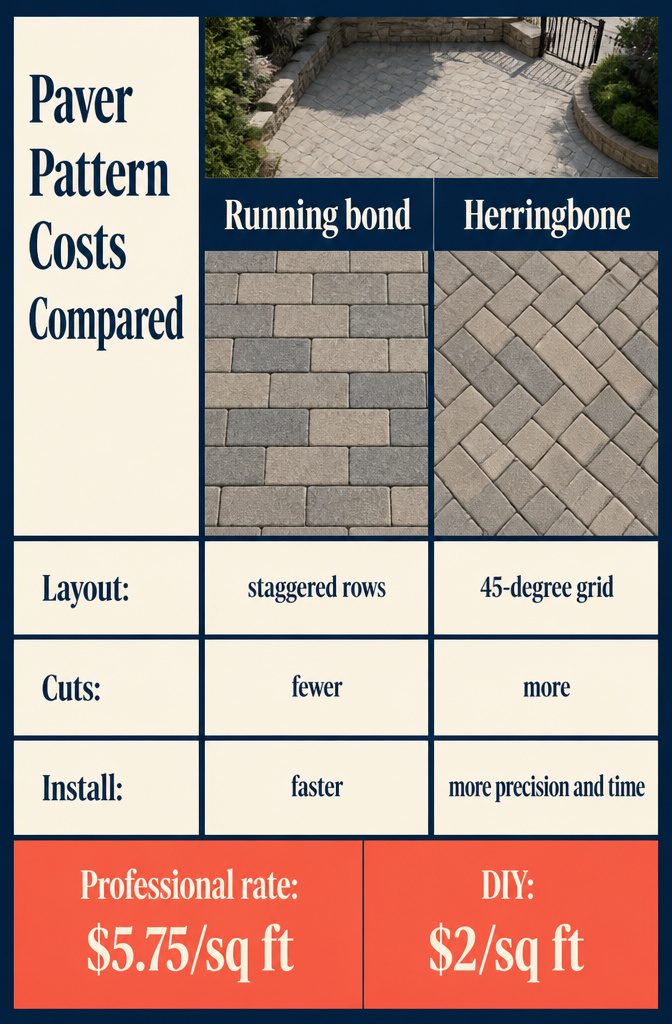
Pattern choice shapes the look and the installation bill. Running bond lays pavers in staggered rows like brickwork, while herringbone angles them at forty-five degrees for a tighter, more formal grid.
Jack-on-jack stacks pavers in straight columns, boxed basket-weave alternates pairs at right angles, and pinwheel rotates squares around a center block.
Running bond and jack-on-jack install faster because they need fewer cuts; herringbone and pinwheel take more precision and more time on your knees with a wet saw.
Before any pattern goes down, you need at least three inches of sand as a substrate, plus a permanent border to keep pavers from creeping.
A poured concrete curb works; so does a plastic edge restraint pinned into the base. For a 1,088-square-foot patio, professional installation runs around $5.75 per square foot, landing at $6,200.
DIY drops that to $2 per square foot on the low end if you handle the excavation and compaction yourself, potentially saving twenty to thirty percent over a full contract.
Testing a Location Before You Commit
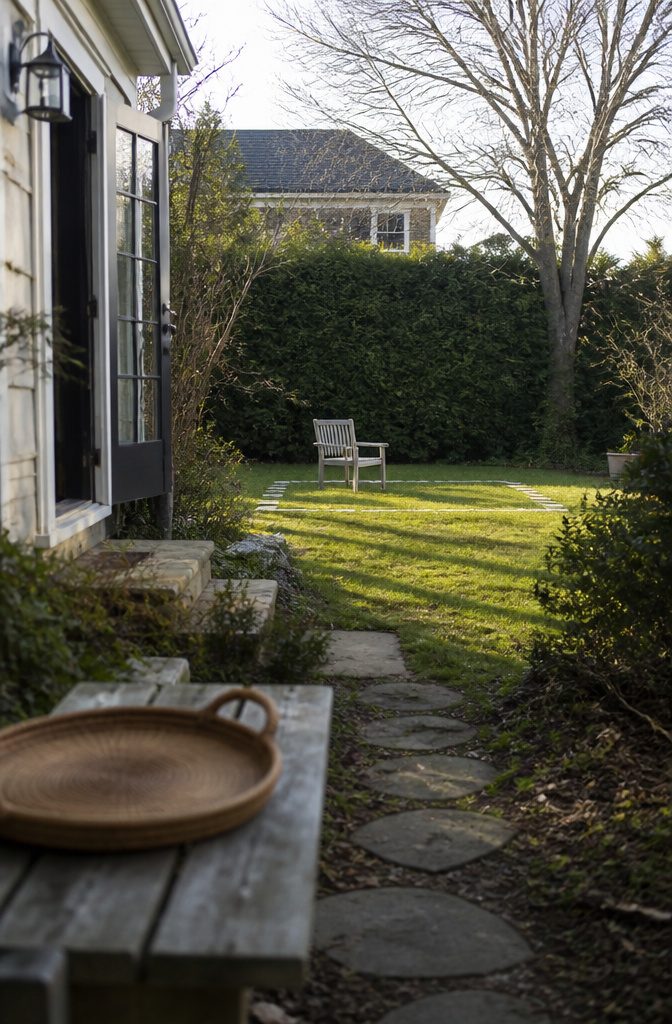
Before you settle on a spot, spend time actually using it. Set a chair where you think the patio might go and sit there at the times you would normally be outside.
Morning sun that feels pleasant at eight can turn a west-facing space into a glare trap by four in the afternoon. Wind that barely registers in July becomes the reason you abandon the patio in October.
Check what you see from that chair and what your neighbors see of you.
A spot that feels open to the yard might put you directly in view of an upstairs window next door, and a location that seems private in summer can lose all its screening once the leaves drop.
Walk between the house and the proposed patio several times to judge the distance—a patio that feels too far from the kitchen door stops being convenient the first time you carry a tray of drinks across the yard.
The relation to the house decides how often you will actually use the space, and a chair tells you that before you move the first paver.
When to Attach the Patio to the House
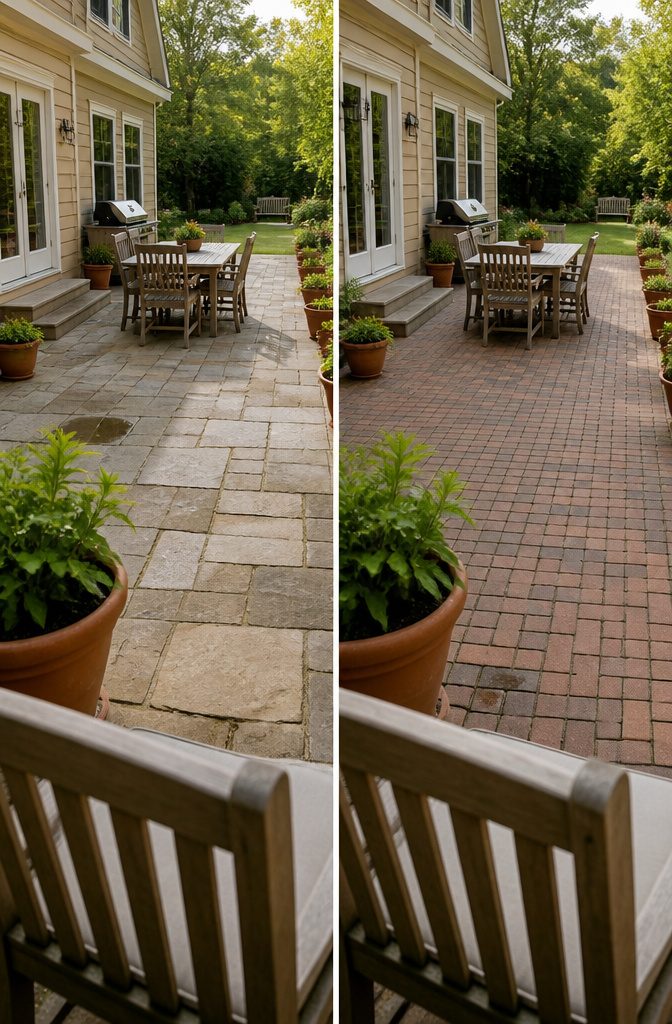
An attached patio makes sense when you’ll be carrying food and drinks out regularly.
If you want a dining setup or a place to host friends close to the kitchen, putting the patio right off the back door saves trips through the yard with loaded trays.
I use that layout when the plan calls for furniture, a grill, or frequent back-and-forth.
A detached patio works better for quiet seating, a fire pit, or a garden retreat tucked farther into the yard.
The trade is convenience for separation: you get space that feels less like an extension of the house and more like its own destination. I prefer detached patios for reading, evening fires, or any spot that doesn’t need kitchen access.
Both need a clear path if they sit away from the door. Repeated plants or containers between the house and the patio help the transition feel planned rather than accidental, and that connection matters as much as the patio itself.
Outdoor Rugs, Furniture Fit, and Wind

Outdoor Rugs, Furniture Fit, and Wind
An outdoor rug helps define the space and makes furniture feel like a room rather than loose pieces on concrete.
The rugs I reach for most are made of flexible woven plastic straws, completely waterproof and durable enough to hose off when they get dirty.
They hold up around pools, under dining tables with kids, and in rainy climates where fabric rugs would sit wet for days.
The Fab Habitat rug in black and white tribal print runs under $150 and works for spots not covered by a roof.
Furniture sizing matters more than most people realize. Measure before you buy so pieces fit without overcrowding, and think about how many chairs you actually need rather than cramming the space full.
Arrange seating in conversational groupings the way you would in a living room: a sofa or sectional, chairs facing in, a coffee table in the center, and side tables within reach.
If you live somewhere breezy, skip tall or lightweight pieces that tip over easily. Washable cushions make sense if the patio sits in shade where mold can build up.
Shade Structures That Work on a Real Budget
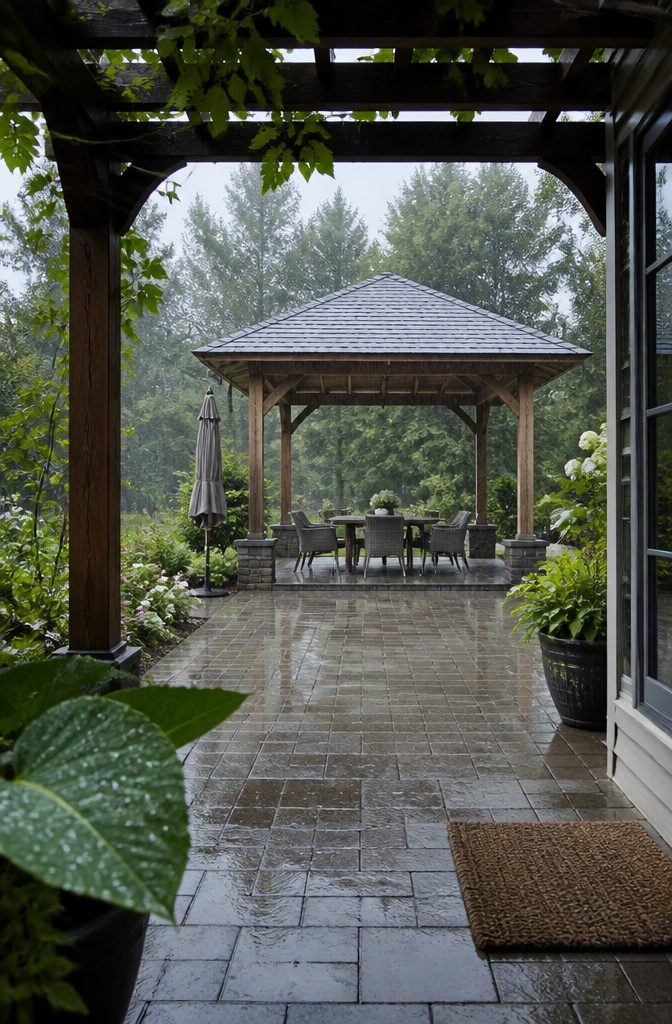
I need shade, and a roof that keeps rain off matters more than an open frame that lets everything through.
A gazebo costs more up front but extends patio use from May through early October where I am — worth it if your season runs short or rain shows up in summer.
In Seattle, that roof bought four full months of reliable outdoor time.
Budget options that still work:
- Shade sail — around $40, mounts to posts or walls, covers the space without framing it in. Least expensive option and installs in an afternoon.
- Pergola with shade fabric woven through or climbing plants trained across — gives filtered light rather than full cover, so plan for sun during peak hours.
- Patio umbrella — flexible since you can move it or close it, but wind is a problem and coverage stays small.
- Outdoor curtains on a simple rod — cheap fix if the sun hits from the side rather than straight overhead.
A gazebo is any structure with a roof, not just the octagon-shaped white ones. The roof is what separates it from a pergola and what makes it work when weather does not cooperate.
Using a Landscape App to Compare Placements

iScape is a free landscape design app with nearly four million downloads, and it lets users test patio placement, size, and furniture layout directly from a phone before marking anything with spray paint or ordering materials.
The app works through augmented reality, so standing in the yard and pointing the camera at a potential spot shows what a paver surface or seating area would look like at full scale.
That makes it easier to compare a location close to the house against one farther out, or to see whether a twelve-by-sixteen footprint feels too large once furniture goes in.
I find this approach more reliable than sketching on paper, since it accounts for the actual proportions of the yard and the way light hits at different times of day.
The app also includes planting options, which helps visualize how shrubs or containers would frame the space without committing to anything permanent.
Frequently Asked Questions
What is the best location for a patio?
The best location balances access, sun exposure, privacy, drainage, and how you’ll use the space.
Sit in a chair at the proposed spot during the times you’d actually be outside to check for sun glare, wind, views you want to keep or block, and whether the distance from the kitchen door makes carrying food and drinks feel like too much work.
A flat area with decent drainage matters more than a pretty corner that pools water or slopes hard enough to need retaining walls.
Should a patio be attached to the house?
Attach the patio to the house when you’ll be carrying food and drinks out regularly for dining or hosting.
A detached patio works better for quiet seating, a fire pit, or a garden retreat tucked farther into the yard where you want separation rather than convenience.
What size patio is best for a backyard?
Size depends on what the patio has to do and how much open yard you want to keep.
A utility patio for a grill needs at least 8×10 feet, dining for 4 takes 10×10 feet, and a multipurpose patio with cooking, dining, and seating zones should start at 18×20 feet.
The regret tends to come from going too small rather than too large, especially once furniture arrives and clearance disappears.
How do I know if my patio is too big for my yard?
A patio may be too big if it overwhelms the yard, removes too much green space, or limits movement and planting.
Use spray paint to mark the footprint in the yard and see whether the shape actually works with the furniture you plan to use, and whether the proportion feels right against the rest of the landscape.
Can a landscape design app help with patio planning?
iScape is a free landscape design app with nearly 4 million downloads that lets you test patio placement, size, and furniture layout through augmented reality before marking anything with spray paint or ordering materials.
Standing in the yard and pointing the camera at a potential spot shows what a paver surface or seating area would look like at full scale, which makes it easier to compare a location close to the house against one farther out.
What are the steps for a beginner to build a patio?
Start by deciding what the patio is for, then choose a location by reading the site for sun, drainage, and access.
Plan the size, shape, and movement, choose materials that suit your home and climate, and check codes, permits, grading, and drainage before you dig.
Excavate 8 to 10 inches deep, compact the ground, spread 6 inches of gravel, add 1 inch of sand, lay the pavers, fill joints with polymeric sand, and compact the surface twice.
How much should a 20×20 patio cost?
A 20×20 patio covers 400 square feet. Professional paver installation runs around $5.75 per square foot, which would land at roughly $2,300 for that size.
DIY drops the cost to $2 per square foot on the low end if you handle excavation and compaction yourself, potentially saving 20% to 30% over a full contract.
What patio material is the easiest to maintain?
Properly sealed smooth or stamped concrete and concrete pavers are nearly maintenance-free. Natural materials like flagstone and slate are durable and long-lasting, but the edges tend to chip over time, and without regular sealer application they will probably stain.